How to be a Part Time Artist (or anything else!)

My DayJob takes it out of me. Especially this week, I am filling in for a co-worker that had to leave for a week and a half on a family emergency, in addition to my normal workload. My job isn’t that physically exhausting, after all I sit at a cubicle for 8 hours, but it is mentally exhausting.

It actually doesn’t matter how busy I am at work, I still get home exhausted. Just being somewhere and having to have my brain turned on and ready to think for 8 hours is tiring.

I’m not in good shape when I get home. The work day leaves me tired, unfocused, and hungry. This is a problem, since the evening is when I work on my art. Being worn out, tired, and looking to sit down, eat dinner, and relax is not a productive way to be.

I don’t have much of a choice, however. Great art does not make itself, and I will not be a great artist as a weekend warrior, only working on Saturday and Sunday. The weekend may work for those of you that are hobbyists, but I do have aspirations to be a professional artist. That takes time.

In fact, I consider art a second job. The difference between my art career and my engineering career is that my art career is completely dependent on the amount of time that I spend working. My engineering career requires pretty much just 8 hours a day.

If you are building a small business of any sort, or getting serious about a creative passion, you probably run into the same problem that I have, finding the time. In hopes to help, here are 3 things that have had a major impact on my ability to get to work, after work.

First, Take A Break

If you work a long day, the first thing required is a break. Last night, I arrived home from work at 6pm. I put on some left over home-made chicken soup on the stove, and put some bread in the toaster. I changed into warm, comfortable clothes (it is unusually cold in San Francisco this week), sat down with dinner, and read some comics.

Eating dinner and reading comics is an activity that relaxes me. I can get absorbed in the activity, without it requiring too much thought. After an hour, I felt refreshed and ready to work on something, much more so than if I hadn’t taken the hour off.

My activities during this break effect the rest of my evening. When I spend an hour on my computer, or watching a TV show or 2, I don’t feel quite relaxed afterwards. Reading relaxes me, and is different enough of an activity that I don’t feel like I am still working.

The key is to do something you enjoy for an hour. That may be reading, spending time with family, talking on the phone with people, folding laundry, or just about anything. I know what works for me, and I’m pretty sure what works for me won’t work for everybody, so this requires some brainstorming on your part.

This hour is my transition hour, and I take full advantage. I relax, eat, take care of chores like dishes or laundry, and remove distractions.

Removing distractions has been so important it gets an entire subsection. Look:

Remove Distractions

There is no greater enemy to productivity than my computer. This is strange to say, because my computers are indispensable tools for everything I do (this is an internet business after all). My entire sales, marketing, and success plan depends on both me and you (my customer) using computers all the time.

My computer is incredibly useful, sometimes. For others, like making art, it is a distraction. When my computer is on, I usually have iTunes open, my email running, Twitter open, my RSS reader waiting, and if I am a real glutton for punishment, I’ll have Facebook fired up.

Being so connected keeps me from getting anything done.

In fact, when I sit down to write in the mornings (like I am doing now), I don’t fire up any applications other than text editors. I know that if I even glance at my email, I have lost time. My attention shifts to that, and it takes time to get it back, if I get it back at all.

My computer is my Number 1 source of distraction. I know I have to remove this to get anything done. Your distraction may not be a computer. It may be television, a family, the telephone, or even that pile of unfolded laundry that you keep thinking of.

During your relax time and your work time, get rid of distractions.

Facilitate Work with Cleanliness

I have been stopped stopped dead in my tracks from working on my art by a big mess.

I have two main work areas in my small studio apartment. The first is in the main room, I have a work table set up. This is where I do my printing, and anything else that requires a lot of flat surface space. When I work at that table, I usually use my coffee table and surrounding floor as a staging area, and secondary storage.

My second work area is my desk next to my kitchen area. My apartment is quite small, about 450 square feet. Pretty much everything in here has to pull double or triple duty. This desk is my work desk, kitchen table, and drawing table all wrapped in to one. When I draw or carve a block, I work at my desk.

Both of these areas are often overcome by one of my less desirable habits — I am messy.

My apartment is entropy in action, slowly changing shape from order to chaos. I have to continuously work to keep it clean. I take stuff out, don’t put it away, move stuff around, and generally make a mess.

When my work area is a mess, I am far less likely to get any work done, because I know I have to clean up, and I rather dislike spending time cleaning up.

When I constantly put a little diligence into keeping my work areas clean, it is far easier to come home after a long day at DayJob and get to work for the evening.

If you can dedicate an area of your home just to working, that is best. You can make that space be the “work only” space, and not use it when you are not building your business part time. If you have to use your every day areas of your home, keep them clean, and it will be far easier to get to work.

What About You?

Are you building a new business part time? Using your hours after work? What do you do to maintain energy and focus after a long day at work? Let me know in the comments.
Thinking in layers, Part 2: Order Matters

Now I’m gonna really mess things up.

Last time I talked about how colors mix together on paper after they are printed, which increases the total number of colors you can get from any number of blocks. By overlapping the areas that blocks print, 2 blocks can print a total of 3 colors, 3 blocks can print 7 colors, and 4 blocks can print 15 colors.

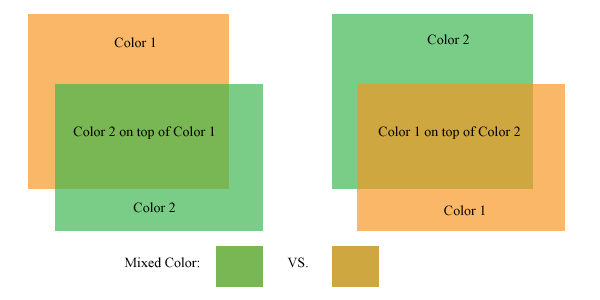
The order that those blocks are printed influences what the mixed color is, as well. If one color is printed on top of another, the color created by the overlap of those two colors isn’t the same if the printing order is reversed.

This quickly ads up to a whole lot of possibilities and choices to make.

Here’s a look at this phenomenon:

Colors mix differently with different printing orders

Colors mix differently with different printing orders

The picture above shows the same two panels of color, but on the left, the green panel is on top of the orange panel. On the right, the orange panel is on top of the green panel. The resulting color created where these two colors overlap is different depending on which color is on top.

In the above example, the mixed color can be a brownish shade of either of the colors. The trick is, it can’t be both. One of the artistic decisions of a printmaker is which order to print the blocks, and which colors will be on the print as a result.

Typically, an artist/printer will print a number of trial prints, trying out different color combinations until settling on a color combination for the final edition. These trials can be as lengthy a part of the printing process as printing the edition, but it is worth it.

The final print often benefits from this type of experimentation. Colors do not always mix the way that we intend them to in our mind, the only way to figure out how two colors will look is to mix them up and put them on paper.

Some considerations:

1. The colors will mix differently based on how transparent the colors are. In the above image, the transparency of each panel of color is set to 67%. This isn’t the exact equivalent of working with inks, but it is close enough to convey the concept. Printing inks are mostly opaque out of the tube or can, transparency is created by adding a transparent medium. I consider this transparent medium the most important can of ink that I have.

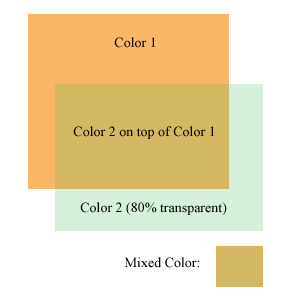
A more transparent color has less effect on the colors beneath it

A more transparent color has less effect on the colors beneath it

The more transparent medium I add to the ink, the more transparent it is (duh). The thing to keep in mind is that if a very transparent color is printed over another color, it won’t effect the color underneath much. It will show up a bit on the white of the paper, but the pigment underneath it will overpower the transparent color.

The image at the left is the same two colors as above, but the transparency is increased quite a bit on the green color. This image was created with photoshop, so it does not completely represent how inks behave when printed on paper. If this was printed on paper, the light green color would probably be more visible where printed on the white paper, but hardly perceptible where printed over the orange. If this were printed on paper, the areas where the very transparent green ink overlaps the orange would probably look more like a glossy coating over the orange than anything else.

2. Some colors print more strongly than others. The CMYK process colors (Cyan, Magenta, Yellow, blacK) are usually printed in that order. If a yellow ink is printed underneath a blue or red hued ink, it will not be very visible. The other colors printed over the yellow ink will dominate it and wash it out. Yellow is usually printed on top of the other colors to give it a fighting chance.

Yellow seems to be the weakest link amongst ink colors. Green and Orange can inherit some of this weakness as well, if those colors are created by mixing yellow ink. (Greens and oranges straight from the can or tube can be a bit stronger than home mixed versions)

Ok, enough color science for today. I’ve gotta go to work at DayJob now!

Thinking in Layers

I’ve been working on a new block for a couple days now, and this one has been a bit of a challenge. I know that this block is going to have a companion block that goes with it, and the two will take advantage of how colors mix when they are printed in layers.

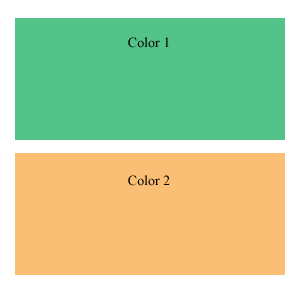
Two separate colors

Two separate colors

One block for every color

Generally, with woodblock printing, for each block, you have one color that is printed. To create a print with three colors, three blocks are needed.

You can see this to the left, in the beautiful image I whipped up to demonstrate this. It would take two woodblocks to print this beautiful work of art.

(Aren’t the colors lovely? Well, at least they demonstrate the point well)

With opaque ink, one-block-one-color is true. Each layer of ink will cover up any other layers of ink under it. With out-of-the-tube ink from your local art store, this is the sort of behavior an artist can expect from their ink.

This is a bit limiting, and luckily for us there is a way to get more from our blocks and from our color by using a little bit of transparency in the ink.

I cheat the system 

My most important ink I have is transparent. It is just ink medium, without any pigment. I add this to my other inks, which are opaque, to add some transparency. The more transparent medium I add, the more transparent the ink becomes.

This creates opportunity, and along with opportunity comes complexity.

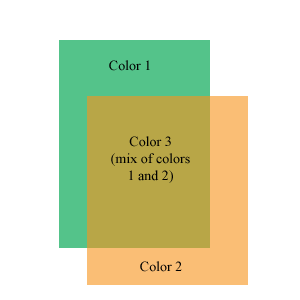
Two colors overlap to create a third color

Two colors overlap to create a third color

Transparency allows the ink to mix on the paper, so that one color will show through another color a bit. They mix to create a third color.

This neat little image on the right I whipped up in Photoshop shows how this works. When two blocks overlap, and transparent ink is used, a third color is created where they overlap. Using this technique, 2 blocks can print 3 colors.

Extending this out to more blocks, 3 blocks can print 7 colors. 4 blocks can print more colors than I care to figure out (11 15, I think, but it is early in the morning).

This hurts my head to think about

My current block is giving me quite a challenge, because I know that it will be printed with another block, and the two will interact to create a third color. When I carve the block, I have to keep in mind that some areas that I carve will be left white on the final print, and some areas will be filled in with the second block. Some areas will be defined by how the two blocks overlap, and I have to leave those areas intact, so that the two colors can print together.

It is interesting to carve a block in this way. Often, I carve blocks with a “black and white” frame of mind. Color will print on the block, except where I carve away.

With this block, I am considering the shapes that this block will print, the shapes the second block will print, the areas where they overlap, and the areas left white by the paper.

I finished carving the first of these two blocks last night (took 3 evenings). I have a busy couple of days coming up, keeping me from my art through the weekend, so I won’t get to the second block till early next week, but look for updates then.

My Art Thanks

It is a bit cliche to write out a list of things to be thankful for on Thanksgiving.

Oh, well.

I’m thankful that I started my current series of prints, it was the kick in the butt I needed to start making art again.

I’ve tried a lot of things over the last few years, coaching, teaching, blogging, and design, but none has felt as satisfying as art. I’m pretty sure I’ve finally landed on the thing that I’ll stick with for quite a while, and find my fortune and glory from.

I’m thankful that I know what is next. I have been working on completing this current series, and until I’m done, am not starting any other projects. I’m hoping to be done by the end of 2009, and can start the next project on Jan 1, 2010.

Ideas aren’t the problem, it is the time to execute, and the time to invest in getting my chops back. With that in mind, I’m thankful that I am dedicated to this. Fortune and Glory does not come to the timid.

I’m thankful to every one who has bought one of the prints (30% sold out already, sign up for the newsletter to get in on the pre-release sale). It has been an encouraging way to start this pre-launch of my art.

The truth that I am discovering is that success with this “art thing” takes a ton of work. It is a job to make art, and another job to market and sell it. Both benefit from full time engagement. Working this in with a full time DayJob gives me a more work than should be possible. It’s a good thing I am a little obsessed with this, so, strange as it is, I’m thankful for my obsessive and compulsive tendencies.

Please, feel free to subscribe to the RSS feed or check back frequently, because I am just getting started with all of this. It is going to take a while, and you are invited to watch it happen.

Be An Artist: Get a Sketch Book Today

[Be An Artist is a new series of posts I am starting – each gives a quick, actionable tip to help you start making art today]

The artists most valuable tool is his sketch book.

It is also a good test of your commitment to art.

One of the two most important things I need to do every day is draw. (the other is to write, which I’m doing now)

I actually didn’t get any time for drawing yesterday. I spent the entire weekend in front of my computer writing the emails and recording some audio content I am going to send you when you sign up for my newsletter.

By the end of the day yesterday I was pretty fried, and didn’t get to it. I should have though.

Anyway, enough about me, onwards to you!

What do you need?

Getting started with a sketch book is pretty low overhead. It doesn’t require much. For about $20, you can be in and out of the art store with everything you need.

Required items:

  • A sketch book
  • Some pencils
  • A pencil sharpener

That’s it.

Take some time when you are buying your sketch book. You are going to be stuck with it for a while, so make sure it is something you like. Don’t get too nice of a sketch book though, I don’t want you to have something so nice that you are hesitant to “mess it up”.

I use regular old pencils that I you can get anywhere, and a cheap plastic pencil sharpener, the kind you can get at your local drug store.

Glenmorangie Bottle - Ink and Colored Pencil

Glenmorangie Bottle - Ink and Colored Pencil

For Over Achievers

For those of you that aren’t satisfied with mere graphite, here’s a few more things you can get to spice up the sketch book.

  • Eraser
  • Colored Pencils
  • Oil Pastels
  • Pens/Markers

This will give you the ability to mess around with some color, and do more in depth drawings in your sketch book.

What to draw?

Good question. It doesn’t matter though.

I even draw myself - Oil Pastel Sketch

I even draw myself - Oil Pastel Sketch

An artist’s sketchbook is for herself, not for others. It is a tool to improve and hone the skills an artist needs. to this end, it doesn’t matter what you draw, it only matters that you draw.

I like to draw whatever is around me.

If I am drinking a cup of coffee, I’ll draw that. If I am sitting on my bed, looking at my desk, I’ll draw that. If I just bought a bottle of Scotch, I’ll draw that.

The what isn’t as important as the how. The point of the sketch book is to improve the skills of seeing, processing what you see, and turning that into line.

Create a habit

The best way to make sure that you draw on a regular basis is to make it part of your daily routine.

I draw in the evenings, after I get home from work. I draw for an hour. I either make it the first thing I do when I get home from work, or the last thing I do before I go to bed.

I need this sort of structure and habit, but another structure might work better for you. It does take effort though to make it happen.

You will be pleased with the work you do, as long as you stick with it, and your progress will amaze yourself.

= = = = = = = = =

The images in this post are from my Flickr account. Check it out by clicking here. There’s not much on it yet, but I am starting to fill it up.

Your 1 Most Important Activity

Something you can do today is more important than everything else you will do.

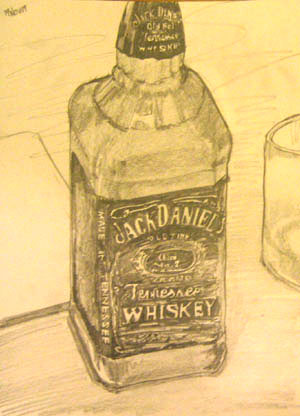
Jack Daniel's Bottle Sketch

Jack Daniel's Bottle Sketch

There is one activity, one thing, that will help you to get what you want, create your masterpiece, or advance your career.

For me, this is drawing.

Despite all of the marketing I may be able to muster, the success of my art is going to depend ultimately on the quality of my art. Since I am not an abstract expressionist, I need to be able to draw (though I would argue that even abstract need to have strong drawing skills).

Drawing is the primary skill that all of my artwork flows from. Without drawing, I can not make art. I would then have nothing to sell and nothing to market.

I need strong drawing skills.

I have recently started a habit of drawing every day, for around an hour. Implementing a habit takes time, but I know that I need to implement this habit as a non-negotiable habit. It is, after all, the most important thing I can do.

I have started very simply. I draw things that are around me. A couple nights ago I drew the desk in my office. Last night, an empty whiskey bottle. What I draw isn’t as important as just doing it. The ability to transform lines into an image, and to recreate what I see on paper is a fundamental skill.

I will not succeed without it.

Everybody has a “most important thing”

This idea does not just apply to artists and drawing.

Whatever you are creating, one thing is the most important thing to do today. If you are a blogger, writing is the most important thing for you to do. If you create iPhone apps, writing code is the most important thing to do. If you are dieting, then exercise is the most important thing for you to do.

The people who succeed are the people that do their most important activity every day, no matter what.

What is your most important thing?

What is that most important activity?

It is the one thing that you cannot have success without.

If I did not have this website, my email newsletter, and mobs of admirers, there is a chance I could succeed on skill alone. It may not be likely, but it is possible.

The successful people are going to be those that do whatever they need to do to succeed, every day. If you do it so much it becomes habit, all the better.

Overachievers are ok too

I lied. I actually have two most important things. One is drawing. The other is writing.

I have two jobs. One is as an artist. The second is as a marketer. The success of each is supported by success of the other.

As a marketer, my most important activity is writing. I’ve written about my morning power hour elsewhere, but maybe I’ll bring it back up here one of these days.

My alarm goes off at 5:45 every morning, so that I can sit at my computer from 6:00 to 7:00 am and write. I write blog posts, email newsletters, sales copy, etc. The important thing is that I write. Sometimes I have no idea what I am going to write, and that’s when I produce that blog post that kinda sucks.

It is more important to write something badly than to not write at all.

I separate my two jobs into morning and evening. In the morning, before I go to DayJob, I am a marketer. When I get home from DayJob, I am an artist. Each of these times has its most important thing to do.

What is your most important thing to do? Leave me a comment and let me know.

By all accounts, I shouldn’t be Writing

I had a busy weekend.

I redesigned this site, and I wrote the first draft of a number of pages on this site that will be the lifeblood of sales.

I created a checkout cart and a gallery of art. The foundation is in place to actually make sales.

I signed and numbered the 101 Woodblock Series. That itself is a lot of work.

I have spent an unholy amount of time in front of two computers all weekend. In fact, when I was going to sleep last night, I had some some great ideas for the sales copy I have to refine this week, and had to wake up, grab a pen and paper, and write down the ideas.

I shouldn’t be sitting in front of my computer again this morning.

The prints that I have been making and discussing on this site are going on sale this week to Insider Newsletter subscribers. Selling art on the internet takes a whole lotta work. Who woulda node?

There are some changes coming down the line to BDD.

The best content, and new, better, multimedia content is going to be moved to an Insiders Only area. Don’t get me wrong, there will still be good stuff here, but the best stuff will be Insider-Only.

The newsletter is available to everyone, but you have to want it. That’s the key. This is a two way relationship, and you have to want to build a relationship with me as much as I want to build a relationship with you.

Now may be your last chance to sign up for the newsletter on the old, not very good sign up page.

You see, I showed the signup page to a friend of mine that is actually good at writing sales copy, and he revised and tweaked the copy on that Newsletter signup page. I haven’t changed it to the new and improved copy yet, but let me warn you: the new copy will force you to sign up. The new copy is so good that you will actually lose control over your free will when you read it and sign up for the newsletter.

Once I use the new copy, that is.

The old copy leaves it up to your free will to sign up. Free will is pretty cool. I guess.

Click here to sign up for the newsletter.

So anyway. I may be writing more on this blog about the sales and marketing of art and the culture of art, in addition to just the production of art.

This should be a nice resource for artists, collectors, and most of all, folks who just like art.

Best,

Deacon

Current Project: The 101 Woodblock Series

The 101 Woodblock Series was created when acted on the knowledge that the only way that I was going to be satisfied with life is if I actually made art, something that I have known is important to me.

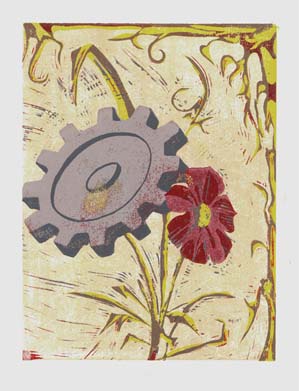
101 Woodblock Series - Number 1

101 Woodblock Series - Number 1

For years, I let things like having a “real” job and working get in the way of creating art. I still have the job to pay the bills, but making art is what actually give me satisfaction.

They always say that you should follow your passions and do what you love to do, but after I finished up college and entered the workforce, that passion got put on the back burner.

It’s been sitting there for years, and I did my best to ignore it for a long, long time, but I finally got to it. I realized that I am not actually going to make anything in this world unless I, well, make something in this world.

I decided that the best way to get to it would be to create One-Hundred and One woodblock prints. Each would be different, and this project would slingshot me back into the habit of making art.

I do this because it feels right to do this.

I have finally felt, in the last few months since starting this project, like I am doing the right thing with my time, and with my life.

So what is the art about?

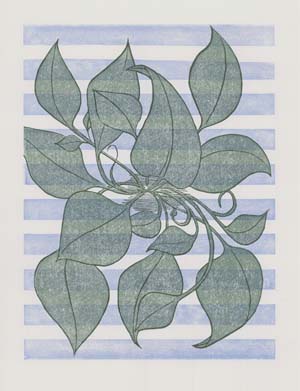
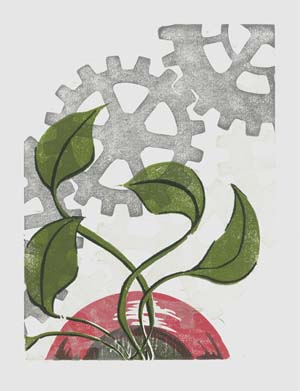
I like to combine plants and organic growth with graphic design shapes and mechanical stuff, like gears. The 101 Woodblock Series is largely about the designs and images that I can create by combining imagery of plants, flowers, gears, machinery, and abstract, graphic elements.

101 Woodblock Series - Number 3

101 Woodblock Series - Number 3

In some ways, I think that the art is about a combination of peacefulness and diligence, peacefulness from the imagery that comes from nature, and the diligence of mechanical function. In some way, this imagery mirrors the creative process of printmaking, which combines artistic creativity with the craft and skill of the printing process.

What is a Woodblock Print anyway?

These prints are all made by the process called relief printing. Often blocks of wood are used to print from, but blocks of linoleum are also used (especially when your local art store doesn’t stock woodblocks).

The block starts out nice and flat, and certain portions are carved out of the block. When ink is rolled onto the carved block, the roller only touches the portions of the block that were uncarved.

The ink is rolled onto the block, then the block is pressed against paper to transfer the ink. Each color on the final print requires a separate block to print. This can be quite a few blocks per print!

A woodblock print requires both the art of creating an image, balancing the colors and making all of the artistic decisions that an artist might with a painting or a drawing, as well as the craft of printing. The blocks must be aligned, the color mixed correctly, applied to the block smoothly, and transferred to the paper evenly.

101 Woodblock Series - Number 15

101 Woodblock Series - Number 15

Art Up For Grabs

The prints in this series are currently available to Insider Newsletter subscribers only. Insiders get the opportunity to purchase one of these prints for my costs to make and ship them. I’m only charging enough to cover my costs for the paper, ink, and blocks that are going in to making these prints, and for the cost to ship it to you.

This offer is only going to last until the series is done, and then the price for all of the prints in this series will increase. If you want to get a piece of hand-printed original art for about the cost of a sandwich and a soda (at least in Downtown San Francisco), click here and sign up for the Insider Newsletter.

UPDATE, 7 Feb 2010: This project is done. The low price is going to remain until mid to late February, then the price increases.

UPDATE, 22 Feb 2010: The promo time period is over, and these go to full price.

The Details

Each print is:

  • Hand inked and printed on Rives BFK paper
  • Completely unique. No two are exactly alike.
  • paper size: approximately 11″x15″
  • image size: 9″x12″
  • Shipped in a large flat envelope between rigid cardboard

For more information about this series and how to add one of the series to your collection, sign up for the Insider Newsletter.

UPDATE, 18 Jul 2020: These aren’t really for sale anymore.

Harder Than Art

When I was in school getting my art degree, guest lecturers would speak about how to be a successful professional artist. They made one thing was abundantly clear: being a professional artist is two full time jobs, one as an artist, and one in sales and marketing.

Back then, I always thought to myself, “whatever. Sales and marketing can’t take that long.”

It turns out, I was wrong. The 101 Woodblock series is almost ready for a pre-launch, available for newsletter subscribers. Putting everything in place to start marketing these things has been a lot of work. Far more than I imagined when I heard guest lecturers say this back in college.

Anyhow, the prints I am making for this current project will be available only to Newsletter subscribers, for a cut rate. The pre-release price is just enough to cover my materials and mailing expenses.

I’m doing these as a crash course in fine art printmaking after all, and, well, as a marketing gimmick. The best marketing is done by giving people far more value than you ask in return after all.

Details will be coming out next week on the Insider Newsletter. If you want to get a head start on signing up, click here to get on the newsletter.

If you have to ask, you don’t get it

Either that, or I am just f**king around.

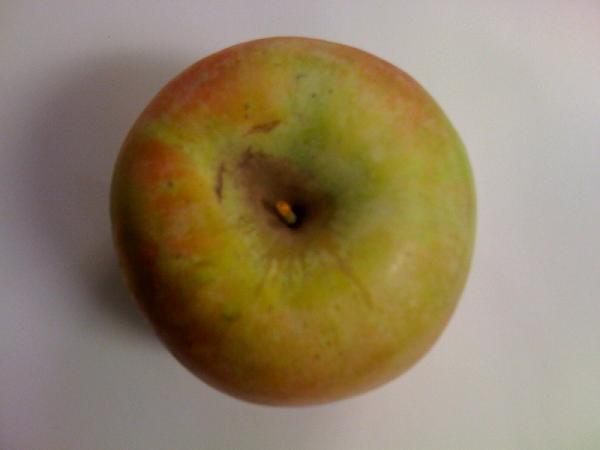
This is not an apple or something

This is not an apple or something

Please, imagine that the above is some sort of thought provoking art.

Small posters of this photograph are available for $75 each. Contact me for details.