Archive for the ‘Printmaking’ Category

101 things I learned from making 101 prints, Part 5

Saturday, February 13th, 2010

After finishing the 101 Woodblock Print Project (printing 101 all-different woodblock prints), comes this series of 101 things I learned by making these prints.

These 101 prints are for sale to email newsletter subscribers (sign up at left). They will be available to everyone in a couple week, but the price increases by about 7x. As a promotion, I am selling them for the price the materials and shipping cost me, nothing more. If you prefer to spend less money rather than more money, act now.

The last 20 prints are going to be uploaded to the sales gallery today, so all the latest, freshest prints are freshly available.

Previously, in this series of 101 things I learned by making 101 Woodblock prints:

The Last 21 Things I learned by making 101 Woodblock Prints

  1. If it starts to take twice as long to carve a block as you thought it would, relax, and get to it. Don’t take any shortcuts, you will be glad you didn’t.
  2. When you are happy with what you accomplished after a long day of work, that is following your passion.
  3. You may not always be passionate about following your passion. Gruel it out.
  4. Leverage your day job as much as possible, but don’t sacrifice performance. Remember what pays the bills.
  5. When you are stuck, not sure what to do next, do the first thing you think of.
  6. The first dollar that you receive from selling your artwork is going to feel really good. I still have mine.
  7. Framed art looks fantastic.
  8. Variety can extend your theme further
  9. Once you have a theme to work with, make small changes to add variety
  10. Get comfortable with selling your work, and accepting money for it.
  11. Learn how to sell your stuff. There are people that probably wouldn’t buy $10 bills for $5, unless you sold them on it.
  12. Don’t worry if you don’t feel excited when you finish. It just means you have bigger things to move on to.
  13. Plan for success.
  14. Keep working.
  15. If you get sick of your project, keep working.
  16. Keep working.
  17. When you are not sure what to do next, keep working
  18. Keep working
  19. When you finish the project, move on to the next, and keep working.
  20. Keep working
  21. Did I mention, keep working?

101 things I learned from making 101 prints, Part 4

Friday, February 12th, 2010

I know what’s been on your mind. After reading the first 20 things I learned, then things I learned numbers 21 through 40, followed by 41 through 60, you are dying to hear the next 20!

If you are new to this list, then you should know the story. I decided to make 101 Woodblock Prints, all different. I recently finished, and they are for sale to newsletter subscribers. Sign up if you wanna buy art for very few dollars.

So here are the next twenty things I learned by making one-hundred and one woodblock prints.

  1. It’s ok to waste some unused ink. You don’t have to use every part of the buffalo.
  2. There might be another use for that leftover ink though.
  3. There may be ways to use a woodblock that you initially did not think of. Look for those uses.
  4. Develop a fast, easy, and reliable registration system. The extra time upfront is worth it in the long term.
  5. Leaving a project unfinished because you don’t feel like working on it anymore is not acceptable. Or rather, it just won’t get you anywhere.
  6. Most art stores have a horribly small selection of relief printmaking supplies. Don’t count on them.
  7. Order from McClain’s Printmaking Supplies. They rock. Other places I’ve ordered from suck.
  8. Call of Duty is the enemy of productivity (though I am lethal with a silenced SCAR)
  9. Good friends will offer good encouragement
  10. Surround yourself with motivated people.
  11. It feels really nice when people like your art. REALLY nice.
  12. It’s even nicer when they email you and tell you they like it. HINT.
  13. Don’t expect everyone to get it.
  14. Feeling understood is one of the most nourishing things in life.
  15. When you get so tired you make stupid mistakes, stop working
  16. Nurture every relationship that comes your way.
  17. Seek out new relationships and connections to strengthen your personal web.
  18. The internet is a time waster. Unplug when time to work (do as I say, not as I do)
  19. When you pull the print off of the final block, and it looks great, it’s ok to actually yell a “woohoo out loud.
  20. When you hang your art in your window to dry, include a sign directing folks to your website. You never know who is walking by.

101 things I learned from making 101 prints, Part 3

Thursday, February 11th, 2010

After putting up the first 20 then the next 20 things I learned by making 101 Woodblock Prints, it is time for….

The 41st through 60th thing I learned by making 101 Woodblock Prints.

  1. “Eyeballing it” is not a reliable registration method
  2. White erasers can erase quite a bit, including stray ink marks on the paper.
  3. To spend the time it takes to make art good enough to impress chicks, you won’t have any free time for chicks.
  4. After 10 hours of work, beer tastes good.
  5. 12 hours spent focusing on carving 1 block is mentally draining.
  6. 3 hours, on the other hand, is no big deal.
  7. It takes a long time to make art, and a long time to market art. Doing both takes even longer.
  8. Decorative art is ok. People like it.
  9. Wood is more delicate to carve than linoleum, and also, it prints better.
  10. Cheap brayers will deteriorate over time. I already told you to get good ones.
  11. Your least favorite art might be someone else’s most favorite art.
  12. It’s ok to take risks, sometimes you will be surprised at the results.
  13. Sometimes you will be surprised at how bad the results are too.
  14. Pay attention to everything you do, it is information to learn from.
  15. Different colors have different pigment strength. Learn what’s what.
  16. Some colors are naturally transparent. I’m looking at you, Prussian Blue and Pthalo Green.
  17. Speaking of Prussian Blue, it is a surprisingly beautiful color.
  18. Always test the color on paper after you mix it on your palette. It will look different on paper.
  19. Trust your gut. If a color doesn’t seem right for a print, don’t use it.
  20. The most important influence on how productive your morning will be is the prior evening.

Check back tomorrow to read the next 20 lessons.

Feel free to subscribe to the RSS feed (check the link up on the left) to get it in your RSS reader automatically)

101 things I learned from making 101 prints, Part 2

Wednesday, February 10th, 2010

I know. This list should have been 3, 5, 7, or 10 long. Not 101.

20 a day is a ton. 101 total is waaaay too many. people who like art, however, and thus, my website, are smarter and sexier than average. I have faith.

Don’t worry, most of these are mere trifles, and won’t require any thought.

There may be one or two hidden in there that have some nuggets of wisdom…

Without any more waiting, continuing from the first 20 things I learned,

20 more things I learned by making 101 Woodblock Prints

  1. Someone else might like most what you like least.
  2. Photograph your art during the day, in the morning, when you have the most natural light available. Indoor lighting is awful for photos.
  3. Give a print a night or two before pasing judgment. It might look better in the morning. Or worse. Either way, give it time.
  4. The color will look darker when it is printed than it does on the palette. Context changes how things appear.
  5. If you leave your computer on to take notes/post to twitter/whatever, you are gonna get ink on the keys
  6. If you are not careful opening ink jars and getting ink out, it will splatter, and your walls will look like a Jackson Pollock painting
  7. Order a LOT more transparent medium than anything else.
  8. People will take pictures of your apartment if you hang your art in the window to dry.
  9. Good ink is worth the extra 15 bucks a jar
  10. I need better brayers.
  11. Cotton rag paper isn’t the best for relief printing, even if it looks nice. Get washi.
  12. Do people care about what goes into making art? I don’t know.
  13. Watching TV in the background will just slow you down.
  14. Listening to audio books won’t slow you down.
  15. Listening to heavy metal will speed you up.
  16. Especially if it is Slayer.
  17. Especially if it is “Reign in Blood“, Slayer’s fastest album (210 beats per minute average!)
  18. Don’t cut corners.
  19. Also, don’t carve corners (or yourself).
  20. And definitely don’t ink the corners.

Curious what the next 20 lessons are? Click to read numbers 41 through 60, amigo. You can also read numbers 61 through 80, muchahco!

101 things I learned from making 101 prints, Part 1

Tuesday, February 9th, 2010

I finished my 101 Woodblock Series the other night, so I thought, what better time to make a list post?

Everyone needs a snack.

These 101 prints were a lot of work. They are for sale to newsletter subscribers for the price of a latte at Starbucks. They go on sale to everyone in a week or two, and the price is gonna go up to about 25 bucks. If you want one, you save over 20 bucks by buying one now. Sign up for the email newsletter to get the goods.

Moving on, a list in many parts..

101 things I learned by making 101 prints.

  1. 101 is a lot of something to make.
  2. Making one hundred and one is as simple as Making 1, then repeating 100 times.
  3. Pink is an easy color to make look good.
  4. Orange isn’t. Sorry, Orange.
  5. Art is a product, like any other. It just has a different set of emotions attached.
  6. Reduction printmaking requires more planning than you did.
  7. Not all 9″x12″ blocks are the same size.
  8. I can go without food when I’m working on art, but not without coffee.
  9. Two pots of coffee is twice as good as one pot
  10. When I drink tea or coffee later in the evening, it is easier to work, but harder to sleep
  11. I get frustrated when I can’t mix the right color.
  12. I get excited when I mix the right color.
  13. Use rags liberally, don’t worry about conserving.
  14. Ink is certainly messy.
  15. If you get a lot of ink on your hands, soap won’t work. Time for paint thinner.
  16. A little paint thinner never hurt anyone. I hope.
  17. Wash your hands frequently. You’re gonna need the hardcore soap, the green stuff with little bits of pumice in it.
  18. If you really think a particular color won’t look good, don’t use it. Mix up another color.
  19. Careful planning can save you time, and ink.
  20. Too much planning can waste time, however. Thinking about what to do never got anything done.

The next 20 continued in tomorrow’s post.

Or, for the overachiever, jump ahead to numbers 41 to 60. Wash it down with numbers 61 to 80.

How to Frame Your Woodblock Print

Sunday, February 7th, 2010

You have a lot of options when it comes time to frame your woodblock print.

The traditional thing to do is to frame and mat the print, which is what I will explain below. This isn’t the only option, however, and you might be able to find another type of frame that will work just fine.

The most important thing to consider when you frame your art is what will make you happy. Don’t be swayed by how you think a piece of art should be framed, if you like how something looks, go with it. Ultimately, frame the piece how you think looks best..

Non-Traditional (and Easy) Framing Options
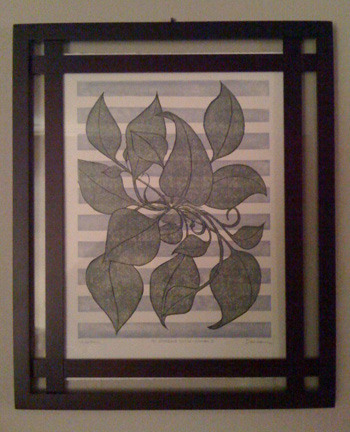
Non-traditional style frame

This frame is not a traditional style of frame, and it looks great!

Longtime friend and collector Dave D. found the frame you see at left at Bed Bath & Beyond, or Pier 1 Imports, or one of those types of stores. It isn’t quite a normal rectangular frame. I took this picture when I was over at Dave’s house for a visit. It is hanging on his wall, and it looks great!

Most of the prints sold on this site are on 11″x15″ paper, and the image size is 9″x12″. Any unconventional frame with an opening about that size will work. There are plenty of options if you want an unconventional frames, meaning something other than the usual regular rectangle.

This particular frame looks like it was made for this print. If you go out shopping for frames, it may help to bring the print with you. If you find something that you think might look great with the print, but you aren’t quite sure, you will be able to easily check.

I have just one favor to ask. As you walk through the store with your print, holding it up to frames to see what will look best, when people ask you where you got that beautiful woodblock print you have with you in the store, please direct them to this website…

I don’t have a particular resource to point you to for these types of non-standard frames, but check a local store or two, you might find the perfect frame (mini-serendipity!)

Clip Frames

I think the frames that “float” the print between two sheets of glass, or squeeze the print between a sheet of glass and a mat – without an actual frame around the perimeter — look nice. These types of frames have a minimal, modern look, and are easy to find.

These types of “frameless” frames are called “Clip Frames” (for the clips that hold the glass against the print). A 12″x16″ Clip Frame is suitable for most of the prints sold on this site. A quick Google search should point you to locations where you can order frames like this for under $10, or you can probably find one at a local store.

If you go with this option, you may need a sheet of paper or mat board to go behind the print. A lot of these types of clip frames use Masonite on the backside, which is a brown color. Since the print is on 11″x15″ paper, this brown will show all around, unless you cover it up. A white 12″x16″ sheet of mat board behind the print will make the the print look great in a clip frame.

A bonus of clip frames is you get to see the entire sheet of paper. The paper around the image is as much a part of the art as the image itself. I consider how much paper margin to leave around the print, and that margin is part of the art.

The other way to display the entire print in a conventional frame is to float the print, which I guess could be considered an “advanced framing technique”. Advanced or not, it certainly is more work.

Framed and Matted Prints

The traditional way to frame a woodblock print, and for good reason. A framed print surrounded by a well-cut mat looks fantastic. There are two things to consider when framing in this way, the frame and the mat. I’ll explain the considerations required for both.

The Frame

A framing shop will be more than happy to put together a custom frame for you (and charge you for it), but you can buy a standard frame just as easily. Already made frames are available in standard sizes, the standard sizes that will work with these prints are 12″x16″, 14″x18″, and 16″x20″.

How do you pick which size? That is up to you. Below are the three sizes of frames shown with a print. Note, these are mock ups, not photos of framed prints, but the mock ups are to scale. This is an accurate look at how 9″x12″ prints look in different size frames.

First up is the smallest, 12″x16″. This is pretty small, and only leaves room for about an inch of mat around the print. Not a whole lot.
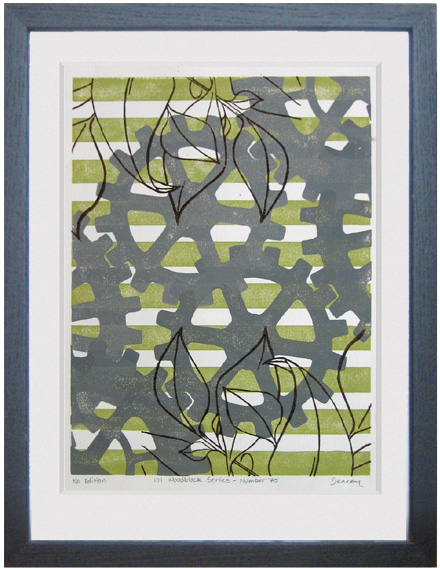
Print in 12x16 frame

101 Woodblock Series - Number 70 in a 12x16 frame

Next, the same print in a 14″x18″ frame. This size frame allows for a larger mat border, a good 2″ or so on either side.
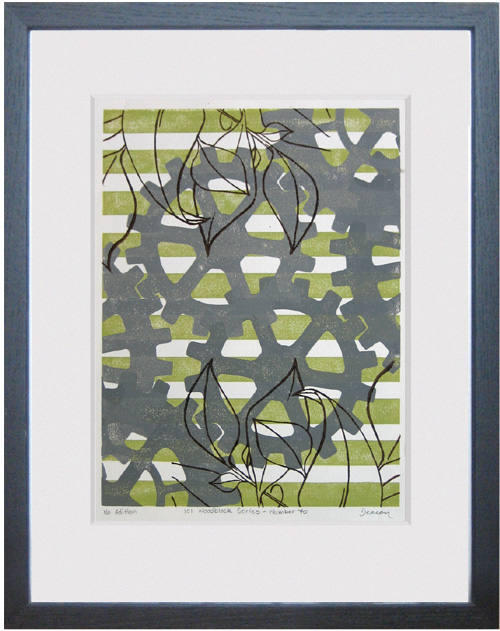
woodblock print in 14x18 frame

101 Woodblock Series - Number 70 in 14x18 frame

Finally, a different print in a 16″x20″ frame. This size really allows for a nice hefty mat border. These extra 2″ will make this print very prominent on your wall.
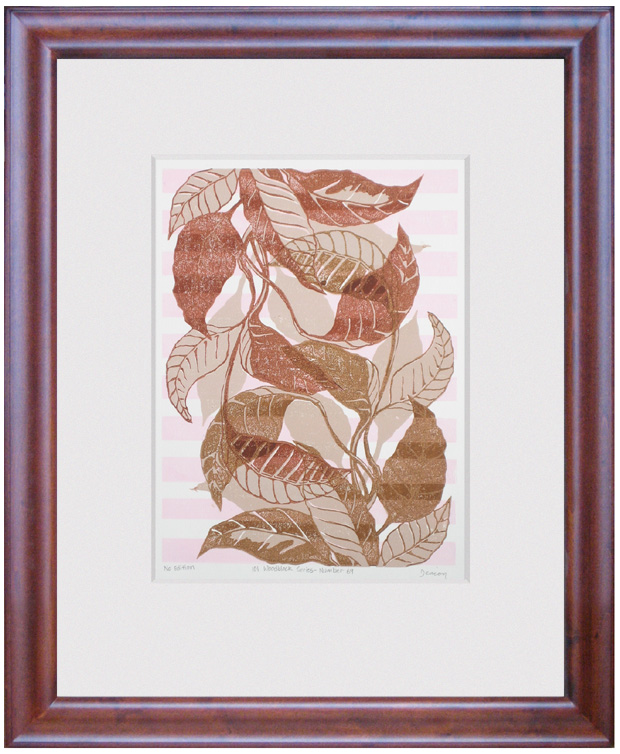
woodblock print in 16x20 frame

101 Woodblock Series - Number 69 in a 16x20 frame

When you go to the store to buy a frame, bring the woodblock print with you, so you can see how the print looks with different colors and shapes of frames. Some prints will look better with a black frame, others will look better with a natural wood color frame. The only way to know what will work best is to test it out.

The Mat

The tricky part of matting and framing a print is cutting the mat. Unless you have a mat cutter (which is a specialty tool), the easiest way to do this is to go to a framing shop and have them cut a mat for you. In fact, even if you do have a mat cutter, it is easier to go to a framing shop and have them cut a mat for you.

The “Window” of the mat is the empty space in the middle. It is typical to cut the window in the mat a little larger than the size of the image. A good size for the window is 1/8″ to 1/4″ larger than the image on the sides and top, and 1/2″ to 3/4″ larger than the image on the bottom. The extra space on the bottom is to allow the number, title, and artist’s signature to be visible.
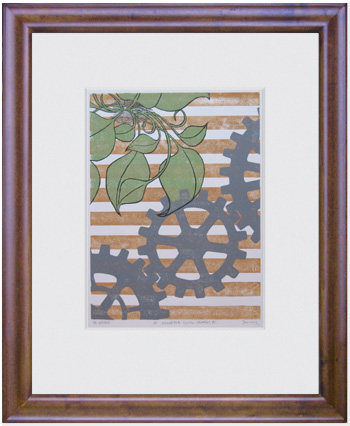
woodblock print in 16x20 frame

101 Woodblock Series - Number 80 in a 16x20 frame

[Note: this is different than how mats for photographs are cut, and the reason why pre-cut mats might not work. Mats for photographs are cut so that the window is smaller than the image, so that the edges of the photo are under the mat. A frame that comes with a pre-cut mat will most likely be cut for a photograph, so the window will be a bit small for a woodblock print. This type of mat can be used, but the edges of the print will probably be covered by the mat, and the number, title, and signature will be covered. If you prefer to frame your print like a photo, however, go for it]

So, what should the widths of the mat be?

The sides are easy, they should be the same, so that the print is centered from side to side.

The top width usually looks better when it is a little wider than the side widths, so add 1/8″ to 1/4″ to the side width to get the top width.

With the 3 standard frame sizes I mentioned above, this will leave the bottom width a bit wider than any of the others, and this is good. Artwork that has been matted always looks better when the bottom of the mat is a bit bigger than the sides and top. It may be just a trick of the eyes, but if you center the print from top to bottom, it will look like it is too low.

For one of the standard 9″x12″ prints sold on this site, here’s a recap of how to cut the mat, in bullet form:
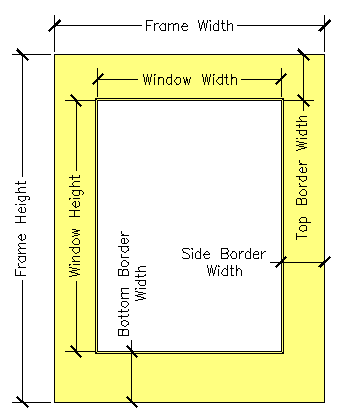
mat dimensions

Visual reference of the various mat dimensions

  • Add 1/2″to the width of the image, this is the width of the window
  • Add 1″ to the height of the image, this is the height of the window
  • Subtract the width of the window from the width of the frame and divide this number by 2. This is the width of the mat on either side.
  • Add 1/8″ to 1/4″ (your preference) to the width of mat on the side. This is the width of the mat along the top.
  • Using these mat widths and the window width and height, the bottom width will automatically be a little bigger, just like it should be

(Wow! It’s almost like I planned the size of these prints so a mat can be cut that makes them look great in standard size frames!)

The last thing that you have to consider is the color of the mat. White or off-white usually looks good. The color of the mat should add to the visual appeal of the woodblock print, not distract from it. This may just require judgment.

If you are getting a mat cut at a frame shop, they may be able to offer advice on what color mat will look best. It is, after all, their job to know this stuff.

When in doubt, however, go with white, or a very light off-white.

So now you’ve got a frame, a mat, and a print. To put it all together, tape the print to the back of the mat. You only need to put tape along the top of the print, this will keep the print from warping if the paper expands or contracts (usually it won’t but humidity may cause some small changes).

If you ask nicely, the guy or gal at the frame shop where you got your mat cut may give you a couple pieces of archival tape. This stuff is designed to last, and to not have any acids, which may change the color of the paper. The paper and inks are archival quality, so with archival tape and a nice mat, it should last a very long time.
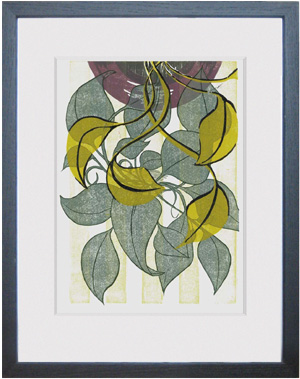
woodblock print in 14x18 frame

101 Woodblock Series - Number 2 in 14x18 frame

The mat goes against the glass of the frame, and the frame will probably have a sheet of cardboard or Masonite to go behind the print and mat.

Now it’s ready to hang on your wall!

Framed and Floated Prints

Floating prints in a frame is just as in depth as matting and framing a print. Also, nearly all standard frames available for sale are not designed to float a print. A special frame is required. In a floated print, the print is attached directly to the backing, usually an uncut mat board. This backing is set back from the glass with a spacer that is built into the frame. When framed in this way, the print seems to “float” in the space between the glass and the backer. The entire paper is visible.

Since framing prints like this requires a specialty frame, I wrote a separate page about float-style framing of woodblock prints.

How to Float Frame a Woodblock Print

Sunday, February 7th, 2010

This page is coming soon!

There is plenty of information about how to frame a woodblock print HERE.

New Work Table = Productivity and Quality of Life Increase

Thursday, February 4th, 2010

Out with the old, in with the new!

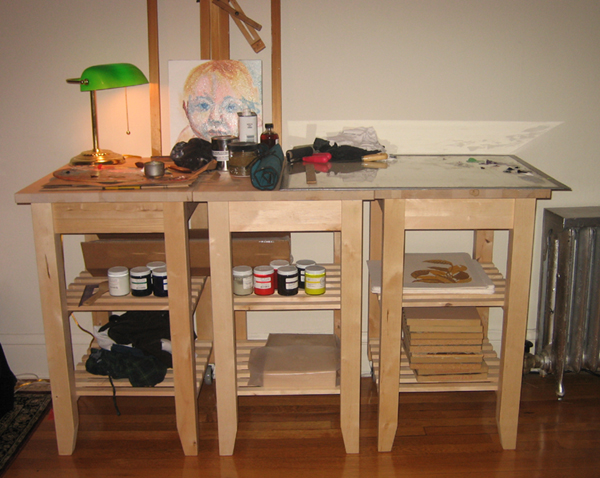
I replaced the dinky folding table I was using as a printmaking work station with a new, improved, modular station of might:

3-part printmaking and painting work area

This work area gives me plenty of room to work, and a lot of storage for my materials. Check out the in progress painting! It's a portrait of a small child.

My new station is made up of three tall work surfaces (ie. kitchen carts) that sit side by side. The tricky thing about finding good furniture was height. Desks are made for sitting at, not standing at, and shelves tend to not be deep enough to give a good work area. Kitchen is made to be used standing up, and addressed both these problems.

This work surface is actually 3 separate carts that can be individually be easily moved. When I was shopping, I thought I was making a concession by buying 3 of these and setting them next to each other, rather than buy one large work table, but I was wrong to think that.

The modular nature of this work area is a benefit. I can move one of them around as needed to use as a stand to paint on (or do anything else, I guess). I am not confined to working along a particular wall.

Instant Upgrade

The effect on my workspace was immediate, and two-fold: I have a nicer work area, and this is a far better tool than my previous work surface (a small folding table).

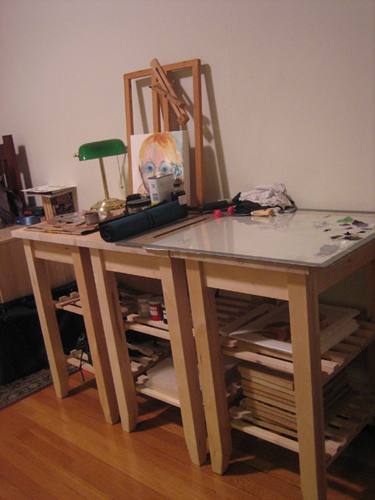
work station in apartment

The new work station fits well into my small apartment.

I do all of my work in my small studio apartment, so I have to live with my work area. This looks nicer, and already is keeping me more organized, both of which make my living space more enjoyable.

The real advantage of this work area is it will be easier to work at. It is taller than my previous work table, so I won’t be bending over for hours at a time when I am printing. I can move the painting section around my apartment as needed, I have been freed up to work where I would like.

As soon as I got this station set up, I knew I made the right decision to upgrade. This work area feels more professional, and I will be able to make more professional work here.

Invest in Yourself

The quality of our work areas effects our performance, I am a firm believer of this. When I have a messy desk, it is harder for me to get to work at my computer. Any impedance to our ability to work will make it harder to get stuff done.

It is always worth the time and expense to upgrade a work area. My upgrade has already made me more productive (and I haven’t even used it yet), since I was able to move all of my painting supplies off of my desk (my other work area) and onto a cart.

If you have been thinking about upgrading to a better work area, or getting better work furniture, do it. You will be happy you did.

A Free Monoprint Available (a mono-what?)

Tuesday, January 26th, 2010

Yes, I have a free print to give away to somebody, just read to the end [update, 11:38am, Jason claimed the print, thanks for giving it a good home!].

It’s a weird abstract thing. Hope you like it.

But first, a short journey into the studio…

Take one big mess…

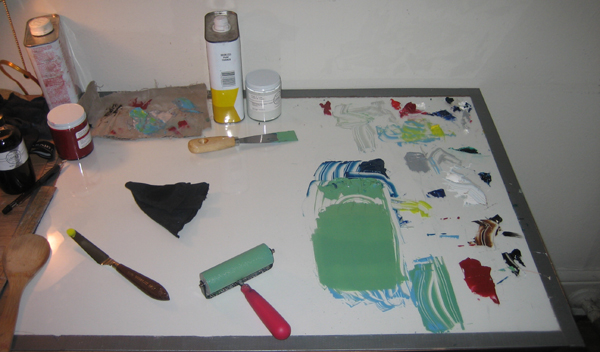
After a weekend of printing, my ink palette looks like this:

My Ink Palette

After a weekend of printing, I have bits of various colors, all partially used.

I have dabs of ink everywhere, and I keep a dollop of every color mixed, in case I use it again. The ink is left out overnight from Saturday to Sunday, 1 day isn’t enough for the ink to dry. It usually takes at least 2 days for the ink to develop a skin.

When I finish printing on Sunday, I scrape off all the unused ink and throw it away, because it will have started to harden by Wednesday, the next day I have any time to print.

Usually, quite a bit of ink gets thrown in the can.

Nothing wasted. Kinda..

I found 1 last use for this ink however.

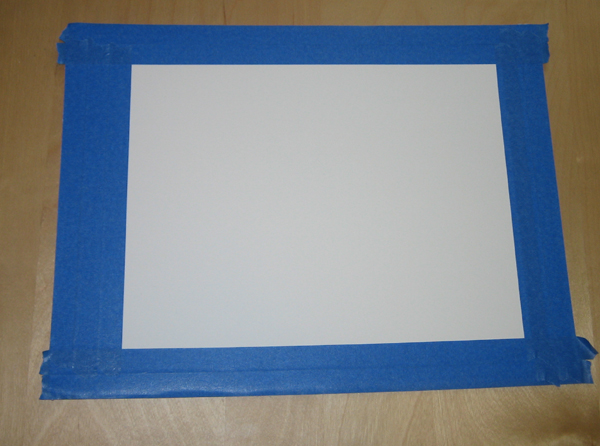
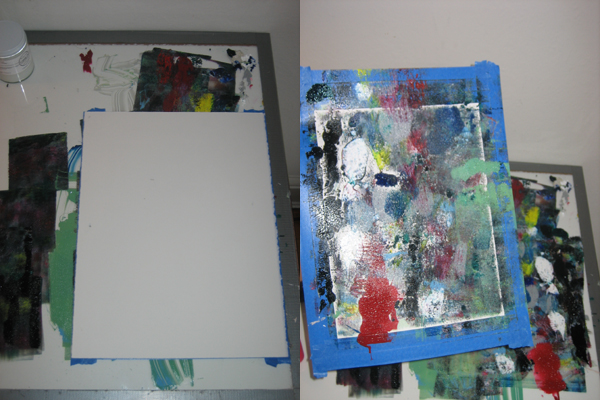
I masked off the edges of a sheet of paper with painters tape, like so:

Masked Paper

The tape protects the margins of the paper from the ink

Lesson learned: painters tape isn’t the best choice when working with this paper (Rives BFK). The tape sticks a bit to the cotton rag, and roughs up the paper when the tape is removed.

Next, roll out all of the ink left on my palette to one big flat mess, and plop the masked paper down on it.

Rub the back of the paper to transfer the ink, then removed the paper from the palette:

The paper is pressed against the ink

Left: the paper is pressed against the ink palette; Right: the paper, after it is removed from the ink surface

The ink left on my palette is a huge mess! This ended up taking more time to clean up than usual.

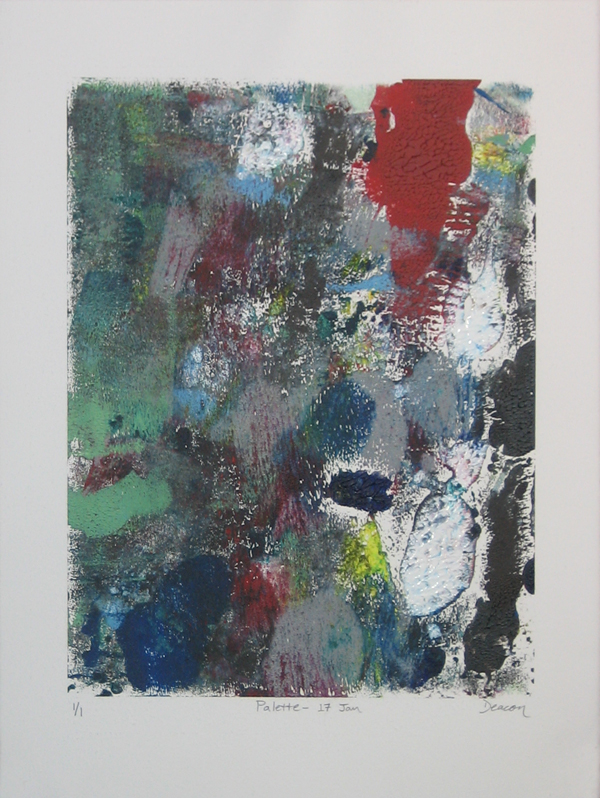
Moving on, I remove the tape masking the edges of the paper, and end up with an interesting monoprint:

Palette-made Monoprint

Palette-17 Jan, monoprint, paper size: 11x15, image size approximately 9x12

A Monowhat?

A monoprint is made by painting ink on a plate of some sort. Glass and metal plates are commonly used, but a flat plate of any material will work.

The plate, with the hand applied ink, is pressed against paper to transfer the image. Usually, only one print is made from each design painted on a plate. Most of the ink transfers to the paper, and needs to be re-applied by hand.

Each monoprint is unique. They are usually labeled as 1/1 in the bottom left corner, meaning it is the first print out of a total of 1 made, an edition of 1.

Monoprinting is a method “in between” painting and printing. All printmaking processes have two characteristics in common:

  • Ink is applied to an element of some sort (metal plate, woodblock, limestone, silkscreen, etc), then transferred to the paper
  • The process is repeatable, allowing identical images to be made

Monoprinting has one of these characteristics, the ink is applied to a plate, and transferred to the paper, but not the other. Since the ink is applied by hand, without mechanical control of where the ink is applied, each iteration cannot be duplicated.

It borrows from both painting and printmaking to form a new, unique medium.

Free Monoprint (only 1 available)

This print was an experiment, and a way to have some fun after a long weekend of printing. The resulting abstract print speaks for itself — however it is up to you to interpret what it says.

Palette made Monoprint

Only 1 available

I played with the ink, and asked myself what will happen when I mix all my leftover colors, and is more a product of chance than of forethought.

This print documents a weekend of work on the 101 Woodblock Print Project, and is a companion piece (of sorts) to the larger project. For me, the “meaning” in this print is the history and documentation of the work I am doing on the larger overall project.

Do you like the image? I’ll put this in an envelope and send it to the first person that sends me an email requesting it and includes their address. I’ll pay for shipping. All you have to do is make the request. To make this easier, I’ve got a contact page.

I’ve only got one of these, so it is first come, first serve.

[Update: Jason beat you to the punch! The print has been claimed]

My Artist’s Cerebral Struggles

This isn’t the kind of artwork I usually make, which is why I am giving it away. This monoprint is the result of following a process largely relying on chance, not on forethought into the design and composition of the image.

The art I usually make is well-planned and thought out. I don’t rely on chance and randomness. Even when I take chances and take risks, they are calculated risks.

Many artists create art closer to the method I followed with this print, allowing chance and the nuances of a process to influence the artwork. The art is more of a document of a process than a composed image.

Both methods are valid, and of those methods, I feel compelled to make composed, planned art. It is difficult for me to allow chance to have a large roll in the final product.

What do you think? Do you mind art that relies more on chance than on composition? What do you think of the method I used to make this monoprint, randomly rolling out my unused ink?

Leave a comment and let me know!

Prints in Progress: Color Choice and Resolution

Thursday, December 31st, 2009

I have to think about color extensively as I am working on a print.

Yesterday’s post about color choice is continued in this post today. In yesterday’s post I mentioned how color can be used to resolve other colors together, and make them work well and look good together.

Examples of Prints in Progress

This print can easily be resolved with a darker green

This print can easily be resolved with a darker green

I have a few prints that are in various stages of completion, one of them has an obvious resolution, one is still making me think. In this section I am going to discuss how I think about color in these prints, and what I think is needed to resolve the colors I have printed so far.

The print on the left is waiting for 1 last color to be printed, and I think that it is pretty clear what that color should be. I plan to print a slightly dulled down (ie. less saturated), transparent forest green color. That color should make this image pop together.

The trick to this image is going to to find a color that is rich enough, but not so rich that it overpowers the other colors already on the page. The 3 colors on the paper so far are not strong in value and saturation, so a very saturated color might visually dominate these colors, and make them appear weaker, and lose definition. A strong color would draw all the attention, and the other colors would appear very gray in comparison.

A color without enough saturation, on the other hand, will make the entire image appear bland, and the definition will be lost because nothing will stand out. If the 4th color is as dull and grayed out as the first 3 colors, then the entire image will appear to be a dull gray mess, and nothing will catch the eye. Everything will blend together, nothing will be interesting.

A quick aside

I wasn’t going to discuss this in this post, but it came up as I was thinking about the above print, because I noticed another completed print that seems to contradict what I said above.

The vibrant dark green works because it is used sparingly

The vibrant dark green works because it is used sparingly

Interestingly, the issue of matching the value of the other colors is more and more of a problem when the area that ink will cover becomes larger and larger. In the previous example, the 4th block will cover a large portion of the paper with ink. This makes the color choice much more important.

If the block applied a smaller area of ink to the paper, then a color with a much stronger value could be used. The color will not overpower the others because there is less of that color on the paper.

The print on the left demonstrates how a stronger color can be used when used sparingly. The first four colors that were printed are all very close to gray, their value is all very low. A strong color could easily overpower all of these subtle colors.

I printed the final block, the little bits of definition of the leaves, with a very saturated green color, straight out of the ink can. I didn’t thin the ink or mix in other colors to tone down the vibrancy of the color.

This choice worked well for this image, and the small, vibrant bits of color make the image come to life in a way that it didn’t before this vibrant color was printed. If the final color covered more of the paper, however, this strong green color would start to overpower the rest of the colors because it would become too dominant.

The fact that there are just very small bits of this color allow me to use a color so vibrant.

Back to the Regular Program

The last block I have to discuss today is another print that is in progress, and that I have created a bit of a problem with.

These two colors will be difficult to resolve

These two colors will be difficult to resolve

The block on the right has only the first 2 blocks printed, but I used 2 very different colors on this print so far. The light blue, and the dirty orange color do not look very good together as they are. A third color is needed to tie everything together, and visually connect these two colors.

Even though these two colors are not that saturated, they look more saturated than they are when placed together. The blue and the orange are compliments (opposite on the color wheel), so they make each other look brighter. Because of this, I will have to mix a color that is a little more saturated than I might guess, because I have to match the apparent saturation of these colors, rather than the actual saturation.

I’m not sure exactly which color I will print on this block next, but it will probably be in the brown family. The trick is going to be to pick the right shade of brown to make these two colors come together. It would be just as easy to mix the wrong color brown as it would be to mix a color that makes the blue and the orange look good.

Last Thoughts

It turns out that I think about color a LOT. Color choice is usually the most difficult part of the printmaking process for me.

If you missed yesterday’s post, click here to check it out. Leave a comment below and let me know if this was interesting, confusing, or anything alse.