Archive for February, 2010

101 things I learned from making 101 prints, Part 1

Tuesday, February 9th, 2010

I finished my 101 Woodblock Series the other night, so I thought, what better time to make a list post?

Everyone needs a snack.

These 101 prints were a lot of work. They are for sale to newsletter subscribers for the price of a latte at Starbucks. They go on sale to everyone in a week or two, and the price is gonna go up to about 25 bucks. If you want one, you save over 20 bucks by buying one now. Sign up for the email newsletter to get the goods.

Moving on, a list in many parts..

101 things I learned by making 101 prints.

  1. 101 is a lot of something to make.
  2. Making one hundred and one is as simple as Making 1, then repeating 100 times.
  3. Pink is an easy color to make look good.
  4. Orange isn’t. Sorry, Orange.
  5. Art is a product, like any other. It just has a different set of emotions attached.
  6. Reduction printmaking requires more planning than you did.
  7. Not all 9″x12″ blocks are the same size.
  8. I can go without food when I’m working on art, but not without coffee.
  9. Two pots of coffee is twice as good as one pot
  10. When I drink tea or coffee later in the evening, it is easier to work, but harder to sleep
  11. I get frustrated when I can’t mix the right color.
  12. I get excited when I mix the right color.
  13. Use rags liberally, don’t worry about conserving.
  14. Ink is certainly messy.
  15. If you get a lot of ink on your hands, soap won’t work. Time for paint thinner.
  16. A little paint thinner never hurt anyone. I hope.
  17. Wash your hands frequently. You’re gonna need the hardcore soap, the green stuff with little bits of pumice in it.
  18. If you really think a particular color won’t look good, don’t use it. Mix up another color.
  19. Careful planning can save you time, and ink.
  20. Too much planning can waste time, however. Thinking about what to do never got anything done.

The next 20 continued in tomorrow’s post.

Or, for the overachiever, jump ahead to numbers 41 to 60. Wash it down with numbers 61 to 80.

I Finished One Hundred and One Woodblock Prints. What’s Next?

Monday, February 8th, 2010

I genuinely thought this would be easy.

Making one-hundred and one unique, all-different woodblock prints turned out to be tremendous work.

The background

In case you don’t know..

Last May (or so), I made a simple wager with Dave. I would make 101 Woodblock prints before he wrote 101 articles about WordPress.

I started printing the day before my birthday, the last day of my 30th year. I started with a couple woodblocks and a couple linoleum blocks, and along with my buddy Patrick, spent the day mashing ink against paper.

I thought I would be finished in a month or two, but I seemed to underestimate the amount of work this would take. A little over 8 months after I started, on Superbowl Sunday, I printed the last run on the last print, right around midnight.

This project was about 10 times larger than I thought it would be.

Dave won the bet many months ago, and got a thriving website as a prize.

I’ve got ink-stained hands and a stack of artwork.

What’s happening to these 101 prints?

They are for sale.

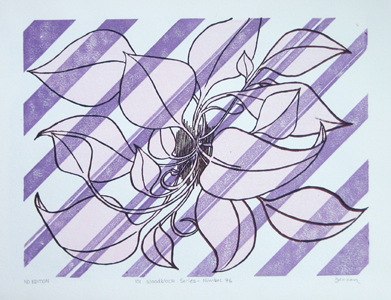
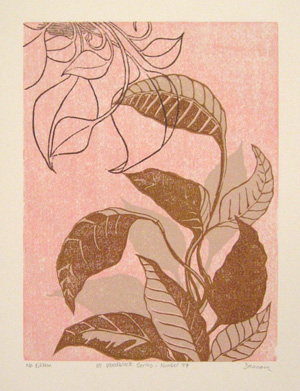
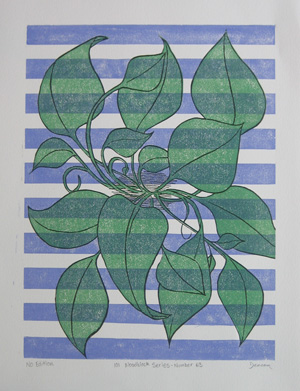
101 woodblocks print number 80

Print Number 80. This and many more like it are part of the 101 Woodblock Series. At this low price, they don't come framed though..

And dirt cheap, for the time being.

As I started to finish these prints, I decided to sell them to my email newsletter subscribers (and ONLY to my email subscribers) for the amount that my materials cost me. That’s $3.55 each, plus $5 for shipping.

Like I said, dirt cheap.

I decided to sell them for this price until I finished all one-hundred and one. Which of course, happened last night. I still need to sign, title and number these, and I need to scan each one, so the price isn’t going up yet.

On February 22, the price increases to something reasonable, $20 or $30 per print. Still cheap, but not dirt cheap.

Sign up for my newsletter, and you will be sent a link to the gallery page where you can see every print, and buy at the current “pre-release” price. Click the word “newsletter” to sign up.

Ok, sales pitch over. You know if $8.50 is a deal for a work of hand-printed art.

What’s next?

Dave was up late last night, and called when he saw my twitter post hit. He gave good advice – don’t stop, don’t take a break.

The temptation is to “take a break” and take some time away from making prints to “recharge” or some such nonsense.

As usual, however, Dave and I were on the same page. What he didn’t know is that I had already started the early work for my next woodblock print. I spent half an hour or so Saturday morning taking reference photos, I’ll do some sketches tonight, and I should be carving the first blocks by next weekend.

Time for a Change

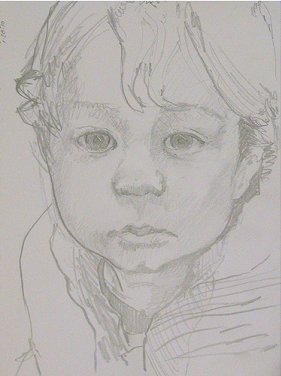
sketch of young boy

A sketch of my nephew, from a visit last December

If you’ve taken a liking to the sort of images I’ve created so far, you’re out of luck.

I’m shifting gears.

The 101 Woodblock Prints were influenced by design sensibilities. I focused as much on color, balance, shape, and other design considerations as I did on imagery.

I’ll be making a shift towards figurative woodblock prints (pictures of people). I want to convey drama, emotion, and pathos. I’m not exactly sure what shape this will take, I’ll find out.

(If I ever use the word “emo” to describe my work, however, you are free to punch me)

My plan is to produce one edition of prints each month for the rest of the year. I’m done making each print unique for the time being, I want to return to traditional printmaking, reproducing the same image a number of times.

What’s next? Lots more work.

No breaks, and no brakes.

How to Frame Your Woodblock Print

Sunday, February 7th, 2010

You have a lot of options when it comes time to frame your woodblock print.

The traditional thing to do is to frame and mat the print, which is what I will explain below. This isn’t the only option, however, and you might be able to find another type of frame that will work just fine.

The most important thing to consider when you frame your art is what will make you happy. Don’t be swayed by how you think a piece of art should be framed, if you like how something looks, go with it. Ultimately, frame the piece how you think looks best..

Non-Traditional (and Easy) Framing Options
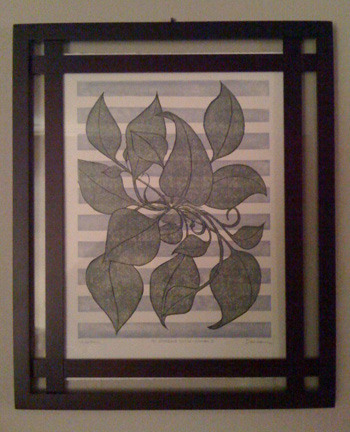
Non-traditional style frame

This frame is not a traditional style of frame, and it looks great!

Longtime friend and collector Dave D. found the frame you see at left at Bed Bath & Beyond, or Pier 1 Imports, or one of those types of stores. It isn’t quite a normal rectangular frame. I took this picture when I was over at Dave’s house for a visit. It is hanging on his wall, and it looks great!

Most of the prints sold on this site are on 11″x15″ paper, and the image size is 9″x12″. Any unconventional frame with an opening about that size will work. There are plenty of options if you want an unconventional frames, meaning something other than the usual regular rectangle.

This particular frame looks like it was made for this print. If you go out shopping for frames, it may help to bring the print with you. If you find something that you think might look great with the print, but you aren’t quite sure, you will be able to easily check.

I have just one favor to ask. As you walk through the store with your print, holding it up to frames to see what will look best, when people ask you where you got that beautiful woodblock print you have with you in the store, please direct them to this website…

I don’t have a particular resource to point you to for these types of non-standard frames, but check a local store or two, you might find the perfect frame (mini-serendipity!)

Clip Frames

I think the frames that “float” the print between two sheets of glass, or squeeze the print between a sheet of glass and a mat – without an actual frame around the perimeter — look nice. These types of frames have a minimal, modern look, and are easy to find.

These types of “frameless” frames are called “Clip Frames” (for the clips that hold the glass against the print). A 12″x16″ Clip Frame is suitable for most of the prints sold on this site. A quick Google search should point you to locations where you can order frames like this for under $10, or you can probably find one at a local store.

If you go with this option, you may need a sheet of paper or mat board to go behind the print. A lot of these types of clip frames use Masonite on the backside, which is a brown color. Since the print is on 11″x15″ paper, this brown will show all around, unless you cover it up. A white 12″x16″ sheet of mat board behind the print will make the the print look great in a clip frame.

A bonus of clip frames is you get to see the entire sheet of paper. The paper around the image is as much a part of the art as the image itself. I consider how much paper margin to leave around the print, and that margin is part of the art.

The other way to display the entire print in a conventional frame is to float the print, which I guess could be considered an “advanced framing technique”. Advanced or not, it certainly is more work.

Framed and Matted Prints

The traditional way to frame a woodblock print, and for good reason. A framed print surrounded by a well-cut mat looks fantastic. There are two things to consider when framing in this way, the frame and the mat. I’ll explain the considerations required for both.

The Frame

A framing shop will be more than happy to put together a custom frame for you (and charge you for it), but you can buy a standard frame just as easily. Already made frames are available in standard sizes, the standard sizes that will work with these prints are 12″x16″, 14″x18″, and 16″x20″.

How do you pick which size? That is up to you. Below are the three sizes of frames shown with a print. Note, these are mock ups, not photos of framed prints, but the mock ups are to scale. This is an accurate look at how 9″x12″ prints look in different size frames.

First up is the smallest, 12″x16″. This is pretty small, and only leaves room for about an inch of mat around the print. Not a whole lot.
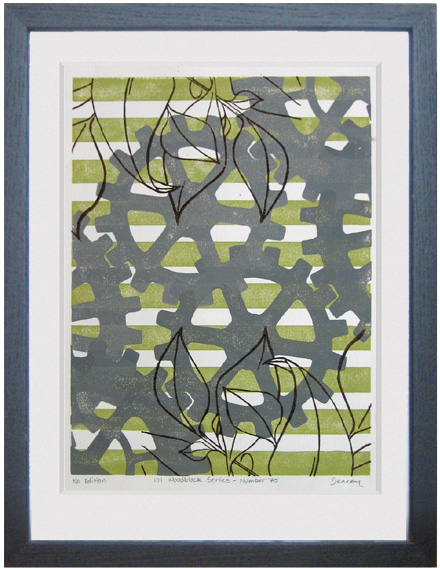
Print in 12x16 frame

101 Woodblock Series - Number 70 in a 12x16 frame

Next, the same print in a 14″x18″ frame. This size frame allows for a larger mat border, a good 2″ or so on either side.
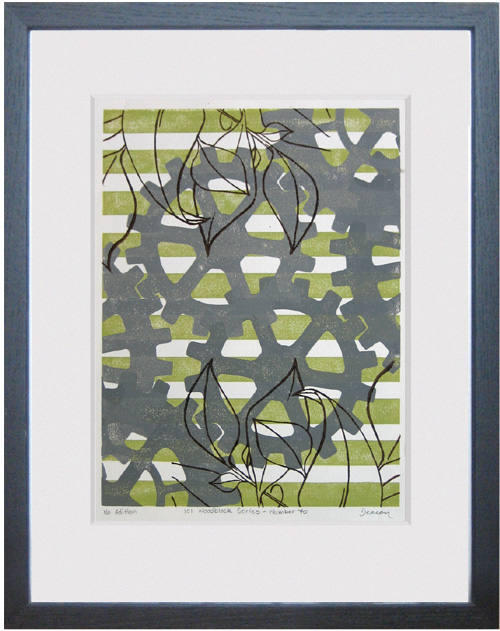
woodblock print in 14x18 frame

101 Woodblock Series - Number 70 in 14x18 frame

Finally, a different print in a 16″x20″ frame. This size really allows for a nice hefty mat border. These extra 2″ will make this print very prominent on your wall.
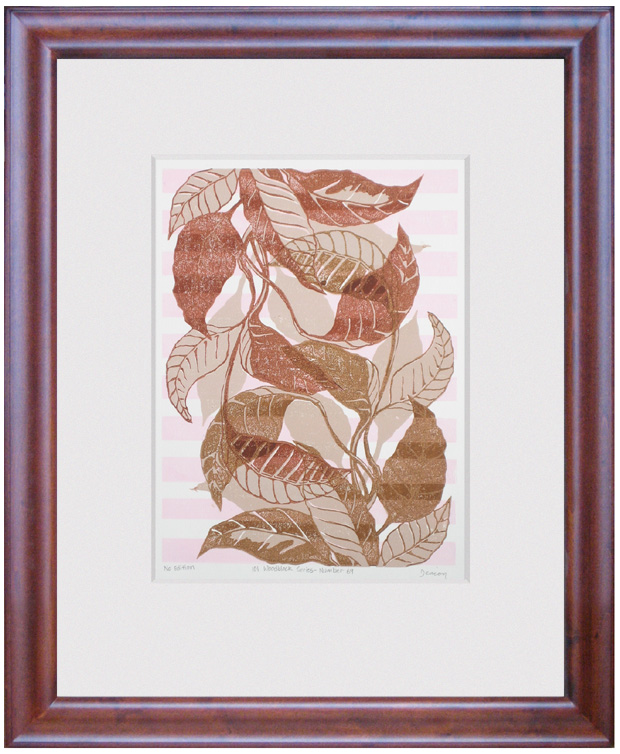
woodblock print in 16x20 frame

101 Woodblock Series - Number 69 in a 16x20 frame

When you go to the store to buy a frame, bring the woodblock print with you, so you can see how the print looks with different colors and shapes of frames. Some prints will look better with a black frame, others will look better with a natural wood color frame. The only way to know what will work best is to test it out.

The Mat

The tricky part of matting and framing a print is cutting the mat. Unless you have a mat cutter (which is a specialty tool), the easiest way to do this is to go to a framing shop and have them cut a mat for you. In fact, even if you do have a mat cutter, it is easier to go to a framing shop and have them cut a mat for you.

The “Window” of the mat is the empty space in the middle. It is typical to cut the window in the mat a little larger than the size of the image. A good size for the window is 1/8″ to 1/4″ larger than the image on the sides and top, and 1/2″ to 3/4″ larger than the image on the bottom. The extra space on the bottom is to allow the number, title, and artist’s signature to be visible.
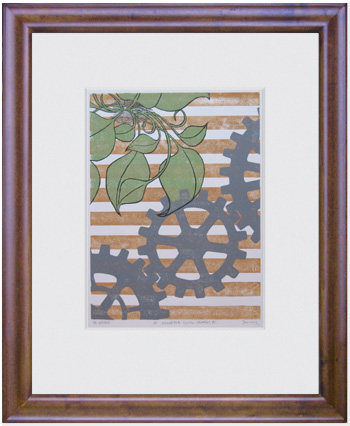
woodblock print in 16x20 frame

101 Woodblock Series - Number 80 in a 16x20 frame

[Note: this is different than how mats for photographs are cut, and the reason why pre-cut mats might not work. Mats for photographs are cut so that the window is smaller than the image, so that the edges of the photo are under the mat. A frame that comes with a pre-cut mat will most likely be cut for a photograph, so the window will be a bit small for a woodblock print. This type of mat can be used, but the edges of the print will probably be covered by the mat, and the number, title, and signature will be covered. If you prefer to frame your print like a photo, however, go for it]

So, what should the widths of the mat be?

The sides are easy, they should be the same, so that the print is centered from side to side.

The top width usually looks better when it is a little wider than the side widths, so add 1/8″ to 1/4″ to the side width to get the top width.

With the 3 standard frame sizes I mentioned above, this will leave the bottom width a bit wider than any of the others, and this is good. Artwork that has been matted always looks better when the bottom of the mat is a bit bigger than the sides and top. It may be just a trick of the eyes, but if you center the print from top to bottom, it will look like it is too low.

For one of the standard 9″x12″ prints sold on this site, here’s a recap of how to cut the mat, in bullet form:
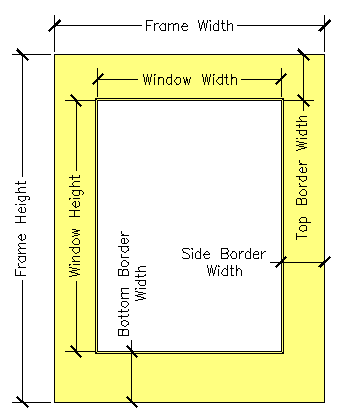
mat dimensions

Visual reference of the various mat dimensions

  • Add 1/2″to the width of the image, this is the width of the window
  • Add 1″ to the height of the image, this is the height of the window
  • Subtract the width of the window from the width of the frame and divide this number by 2. This is the width of the mat on either side.
  • Add 1/8″ to 1/4″ (your preference) to the width of mat on the side. This is the width of the mat along the top.
  • Using these mat widths and the window width and height, the bottom width will automatically be a little bigger, just like it should be

(Wow! It’s almost like I planned the size of these prints so a mat can be cut that makes them look great in standard size frames!)

The last thing that you have to consider is the color of the mat. White or off-white usually looks good. The color of the mat should add to the visual appeal of the woodblock print, not distract from it. This may just require judgment.

If you are getting a mat cut at a frame shop, they may be able to offer advice on what color mat will look best. It is, after all, their job to know this stuff.

When in doubt, however, go with white, or a very light off-white.

So now you’ve got a frame, a mat, and a print. To put it all together, tape the print to the back of the mat. You only need to put tape along the top of the print, this will keep the print from warping if the paper expands or contracts (usually it won’t but humidity may cause some small changes).

If you ask nicely, the guy or gal at the frame shop where you got your mat cut may give you a couple pieces of archival tape. This stuff is designed to last, and to not have any acids, which may change the color of the paper. The paper and inks are archival quality, so with archival tape and a nice mat, it should last a very long time.
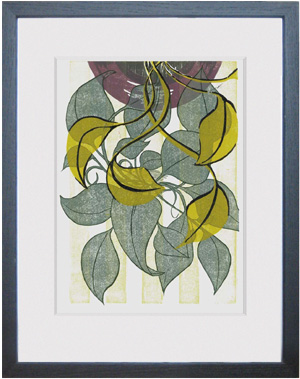
woodblock print in 14x18 frame

101 Woodblock Series - Number 2 in 14x18 frame

The mat goes against the glass of the frame, and the frame will probably have a sheet of cardboard or Masonite to go behind the print and mat.

Now it’s ready to hang on your wall!

Framed and Floated Prints

Floating prints in a frame is just as in depth as matting and framing a print. Also, nearly all standard frames available for sale are not designed to float a print. A special frame is required. In a floated print, the print is attached directly to the backing, usually an uncut mat board. This backing is set back from the glass with a spacer that is built into the frame. When framed in this way, the print seems to “float” in the space between the glass and the backer. The entire paper is visible.

Since framing prints like this requires a specialty frame, I wrote a separate page about float-style framing of woodblock prints.

How to Float Frame a Woodblock Print

Sunday, February 7th, 2010

This page is coming soon!

There is plenty of information about how to frame a woodblock print HERE.

Sales Pitch for Men: Give Her Hand Made Art for Valentine’s

Friday, February 5th, 2010

You need a gift for your woman.

Art makes a wonderful gift. It can be so difficult to buy, and I want to make that easier.

Coincidentally, I happen to have some hand made original art for sale…

Maybe we can scratch each others back (so to speak). Now, let me hock my wares.

Cheaper than Chocolates

101 Woodblock Series, number 76

101 Woodblock Series - Number 76

I am selling the prints from my current project, the 101 Woodblock Series, for dirt cheap. Like, a-latte-at-Starbucks cheap.

These aren’t sissy print reproductions. Each color is printed with a hand carved block. The block is inked by hand with a roller, the paper is pressed against the block, by hand, to transfer the ink.

Each one made by hand. Each one is different, and unique.

Why so cheap?

Nobody knows who I am. Yet. I’m selling my art cheap so it is irresistible, and you learn who I am. Maybe you will like some of the art I make in the future too (it won’t be so cheap though).

101 Woodblock Series - Number 77

101 Woodblock Series - Number 77

Anyway…

You need to get something lovely for your woman. I have something lovely to sell to you. You then give it to your woman, and she will be happy.

I’ll even tell you how to frame it. Easy Peazy.

Here’s the hoop: you have to be on my email list to get the art. I’m only selling these woodblock prints to email subscribers, and it is gonna stay that way until I finish the project.

When it’s all done, anyone will be able to buy these, no email subscription required. The price is gonna go up though, and you’re gonna have to give me bills with lesser known presidents on them to purchase (I know Jackson “retrieved” land from indians and drove bankers nuts, but what did Hamilton do?).

Right now, for email subscribers, these cost you a few pictures of Washington (with a Lincoln to cover shipping).

To entice you more, I put away the manly brown, red, green, and gray colors I usually use and printed some of them with blue, pink, purple — nice Valentines colors.

(I am sweet and considerate)

Thinkin’ about it?

101 Woodblock Series - Number 63

101 Woodblock Series - Number 63

Want to take a look?

As of this writing, I have about 35 unique prints completed and available. The images on this page are just a sample of what I’ve got waiting to show you in the “back room”.

You just gotta sign up for my newsletter (you will get an “opt-in” email first to make sure you really want to be on my list), and the first regular email I send will have a link to check all of the woodblock prints out.

You can even unsubscribe after you check out the art (it’s you, not me, I get it). No big deal. I use one of the good email list services that make it easy to unsubscribe, not one of those shisty ones that make it impossible.

Any orders I receive by Sunday night (Feb 7) will be shipped to you by priority mail Monday morning (Feb 8). It will arrive mid to late week next week. These are shipped in big envelopes with rigid cardboard to make sure they stay flat while in transit.

If you think your significant one might like some original art, go ahead and sign up by clicking here.

If you decide you really just want one for yourself, and don’t buy one as a gift, that’s O.K.

New Work Table = Productivity and Quality of Life Increase

Thursday, February 4th, 2010

Out with the old, in with the new!

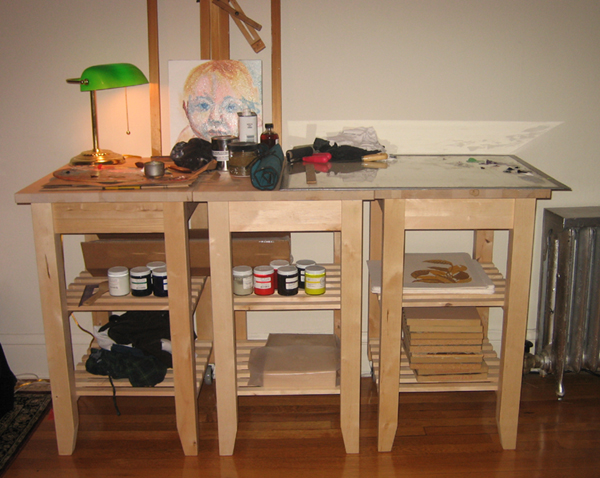
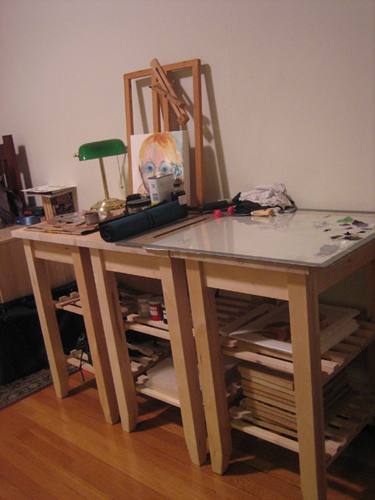
I replaced the dinky folding table I was using as a printmaking work station with a new, improved, modular station of might:

3-part printmaking and painting work area

This work area gives me plenty of room to work, and a lot of storage for my materials. Check out the in progress painting! It's a portrait of a small child.

My new station is made up of three tall work surfaces (ie. kitchen carts) that sit side by side. The tricky thing about finding good furniture was height. Desks are made for sitting at, not standing at, and shelves tend to not be deep enough to give a good work area. Kitchen is made to be used standing up, and addressed both these problems.

This work surface is actually 3 separate carts that can be individually be easily moved. When I was shopping, I thought I was making a concession by buying 3 of these and setting them next to each other, rather than buy one large work table, but I was wrong to think that.

The modular nature of this work area is a benefit. I can move one of them around as needed to use as a stand to paint on (or do anything else, I guess). I am not confined to working along a particular wall.

Instant Upgrade

The effect on my workspace was immediate, and two-fold: I have a nicer work area, and this is a far better tool than my previous work surface (a small folding table).

work station in apartment

The new work station fits well into my small apartment.

I do all of my work in my small studio apartment, so I have to live with my work area. This looks nicer, and already is keeping me more organized, both of which make my living space more enjoyable.

The real advantage of this work area is it will be easier to work at. It is taller than my previous work table, so I won’t be bending over for hours at a time when I am printing. I can move the painting section around my apartment as needed, I have been freed up to work where I would like.

As soon as I got this station set up, I knew I made the right decision to upgrade. This work area feels more professional, and I will be able to make more professional work here.

Invest in Yourself

The quality of our work areas effects our performance, I am a firm believer of this. When I have a messy desk, it is harder for me to get to work at my computer. Any impedance to our ability to work will make it harder to get stuff done.

It is always worth the time and expense to upgrade a work area. My upgrade has already made me more productive (and I haven’t even used it yet), since I was able to move all of my painting supplies off of my desk (my other work area) and onto a cart.

If you have been thinking about upgrading to a better work area, or getting better work furniture, do it. You will be happy you did.