I’ve been rattling around an idea for a while, ever since I first pulled a print on mylar.
I have been using mylar to transfer my key block onto other blocks, since the mylar, due to being plastic, doesn’t absorb ink like paper. I can print on mylar, and then press the printed mylar onto another block, to transfer the ink.
What I noticed, however, is that the mylar is translucent, and color on the back side shines through to the front. Even more, this effect is more prominent when the mylar is lit from the back.
I’ve wanted to take advantage of this for a while, and with a long weekend available, I set to work.
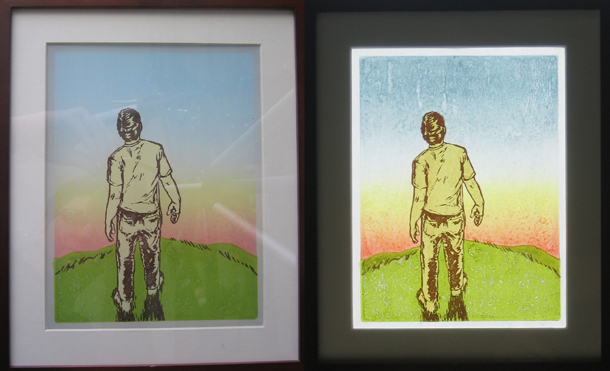
I came up with this: It is called “Sunrise”, it is an 8″x6″ woodblock and linoleum block print, printed on both the front side and the back side of the mylar.
The both of the images above are the same print, in the same frame. On the left, the print is against a wall, without any back lighting. On the right, the print is hanging against my window, with the sunlight coming in through the window behind it.
I am pretty happy with how these turned out. What I like the most is that the image changes depending on how it is viewed, and how it is lit. My thoughts about using mylar turned out to be true!
I’ll have these up for sale soon. Since proper presentation is an important part of this print, I want to find the best way to mat and frame these prints before putting them up in the shop.
And yeah, I want to make more sun prints.
Tags: Linoleum Block, Mylar, Sun Prints, sunrise, Woodblock Print

Nice work. Glad to see you’re back at it.
Hello!
Like the print and the mylar effect very much!
I am experimenting with relief printing on mylar right now, and was wondering what ink did you use?
How does it hold on mylar? does it smudge?
Looking forward to your reply.
Hi Esya,
I’m using Gamblin relief inks, which I purchase from McClain’s Printmaking Supplies (http://www.imcclains.com/). They’ve always provided me with great service, and the inks are the highest quality that I’ve found.
The ink is slippery on the mylar when the impression is taken, and it requires a bit of care not to slide the block on the mylar and spread or smudge the ink. The ink doesn’t absorb into the mylar like it does with paper. I’m printing on frosted mylar, which has a little bit of tooth to it. I imagine it would be much more difficult to print on smooth mylar.
Once the ink dries, however, it is good. I printed the print above over a year ago, and it is still looks as it did the day it was printed.
I just printed BW on mylar to see if it could be done, and now see you can print color!
I am doing the same thing, but am using prismacolor pencils on both sides of mylar. I then coat both side with Art Resin epoxy. After the artwork is encapsulated in epoxy,
I drill a couple holes at the top to use for hanging. It’s an awesome look and feel and I thought it would help with your not having to mat and frame? I love the play of light that is achieved and was thinking that maybe there is a way to have some back-lighting that is well thought out?