My friend Dr. WordPress over at Website in a Weekend wrote a fantastic article about the virtues of laying out your site using graph paper. This prompted me to write this post, about how I use graph paper.
Why use graph paper?
Before I write about how I use graph paper, however, I want to tell you why I use graph paper to design and layout websites. To put it simply, I use graph paper because it is faster, easier, and better web design.
Faster web design
It is faster because I can sketch out an idea far faster than I can in Photoshop. As a result, I can see a number of different design ideas very quickly. Sometimes I will have an idea in my head, and sketching it out gives me a good idea of what that idea looks like when it is actually presented. For my personal site, I am currently working from the third design I have considered.
Once a design is committed to code, it is far harder to change. To change the size or location of an element, you may have to change a good number of the elements of your website. Not fun. Changing the size or location of an element on paper is as simple as whipping out your eraser and making a few pencil marks. Getting things well sized and located is many times faster than editing a CSS stylesheet.
Easier web design
Once you have a layout on graph paper, it is very easy to translate this into code. Need to know how wide to make a certain div? Just count the squares. When everything is layed out on graph paper before a single line is typed into your stylesheet, the actual time spent translating that design to code goes much faster.
I do like to save time.
Another side benefit of this is that “happy accidents” are more easily translated to the code. Random marks, lines, borders, or whatever are easier to write into your code when there is a nice grid that shows what the radius of that rounded corner is, how many pixels over a certain element overlaps the sidebar, or whatever else you need to figure out.
Better web design
When it is easy to whip out a design in pencil and paper, it is very easy to revise. Sometimes when working on graph paper, I will have another idea for the design that I think may be even better than the one I am working on. The result of scrapping a previous design idea and starting fresh is almost always a better design. Good things about the previous design can usually be preserved, and the not-so-good elements are usually replaced with a better design. Doing a few quick permutations of a design idea is probably going to result in a better design than sticking with the first idea.
Also, I feel like design comes out as a more cohessive product when it is done on paper first. It is easy to get carried away thinking about a website as a collection of parts: your header, content area, sidebars, divs, widgets, etc. When working on paper, it is easier to see the relationship of all the parts, and to get a good sense of how the whole looks.
My method
My method comes from my tools. What are they?
There are 4 very important tools I use:
- Graph paper
- Pencil
- Engineering scale
- Calculator
In addition, I may use any number of colored pencils and pens.

I start my work by simply putting pencil down on paper. For my first pass, I work fast and loose, and get all of the design elements I want down and work on their arrangement. I include major image ideas, locations of sidebars, headers, how I want to break up content, and so forth. When I first start out, I just want to get a layout sketched out. I will do another sketch later to really define everything, so I don’t worry too much about accuracy.
I have two pads of graph paper, one that is 8-1/2″x11″, another that is 11″x17″. If I am doing a very loose concept sketch, I usually use the smaller paper, and save the bigger stuff until my second pass.
Which takes me to my second pass. Once I have a concept idea I like, I get more exact with it. I figure out the dimensions I want to work with, I break stuff up into a grid, and get more exact with defining things. I will usually put a bit of notes on this second pass, and include information about classes and ids that I plan to use throughout the design. In other words, I half think in design, I half think in code.
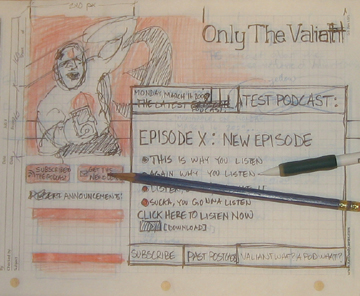
Sometimes the result is nice and tidy, sometimes the result is sloppy. Here’s an example of a sloppy one I did for Only The Valiant (click for a bigger image):
Next up comes the technical stuff of how this works.
The technical stuff
To put it simply, each square on the graph paper corresponds to a certain number of pixels or ems. I tend to work in ems a lot, and I generally use a scale of one square = 1.5 ems. This gives me a paper design that is fairly close to what will appear on screen.
The most helpful tool I use is my Engineering Scale. Note that if you are buying a scale, there are two common types of scales, an engineering scale and an architect scale. The engineering has nice round numbers on each end, like 10, 20, 30 , 40, 50, and 60. The architects scale has fractions, like 1/4, 1/2, 3/4, 3/8, etc. The Engineering scale is the one that is useful for what we are doing.
A quick aside, these are traditionally used for civil and architectural plans respectively. The numbers on each side show which scale that sequence of numbers measures. For the Engineering scale, the numbers represent the number of feet per inch. For instance, a civil engineering plan in 50 scale would represent 50-feet in each inch of paper. The architects scale works the other way around, and the number of the scale represents the number of inches that represent one foot. For example, the 1/4 scale means that 1/4″ represents 1-foot on the architectural plans.
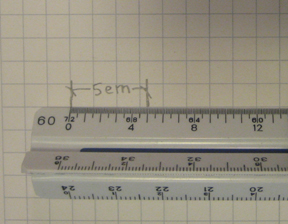
I have found that the 60 scale works best for me, and this measures out 6 ems per inch, as you see below:

I use my calculator to translate back and forth between ems and pixels. Though I often define almost everything in ems, sometimes I need to know what that represents in pixels. I don’t resize my ems, so I am multiplying and dividing by 16 a lot to go back and forth between the two units.
Using the 40 or 50 scale works when measuring in ems, and the 10 scale will kinda work to measure in pixels (and will be quite accurate for a 96 dpi display).
I do everything in pencil first, then sometimes add color to see how that will look. I adjust and adjust as I go, tweaking things as I see fit. I have found that revision leads to a better design.
If you design on paper first, or even use graph paper, let me know how you do this in the comment section. I’m sure that there are other variations on this method that I don’t use, mostly because I am not used to using them (creature of habit), but I am curious!
Tags: graph paper

Watching you lay out Only The Valiant on graph paper using that tear-away technique to handle pages other than the front page was really amazing.
[…] out my friend Sean’s website for Only The Valiant. Yep, that’s a WordPress website, and he laid the whole website out on graph paper before he started tinkering with the theme. (Smart bears might take a look through his CSS to […]